|
Wonderland Adventures Editor
REFERENCE LIST
Main Editor Window
Use cursor keys, Numpad keys, or the left-side of your keyboard to scroll and zoom the viewable area of the editor (pressing the SHIFT key at the same time accelerates the scroll rate). Left-clicking on a tile places the currently selected Tile or Object (depending on what is active), overwriting the currently existing Tile or Object (only one object per location). Right-clicking a tile makes that tile/object the currently selected tile/object (depending on if you are in Tile or Object mode). Pressing the “delete” key will delete an object (if there is one) and automatically switch to Object Mode.
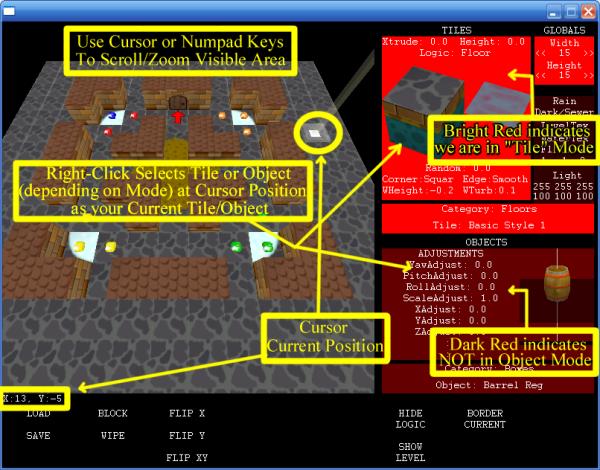
Tiles
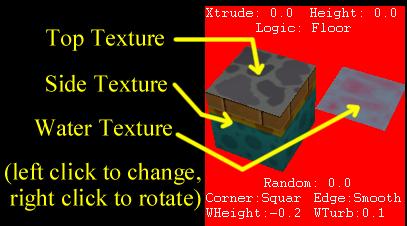
Each tile is made up of four parts: the top surface, the four sides, and a water surface. (Even if no water is visible. In that case the water surface is simply moved below the top surface). Textures for all three surfaces can be selected by left-clicking that surface in the currently selected tile window. Right-clicking will rotate through 8 position (four 90 degree rotations, repeated by the same rotations but mirror-imaged).
Note that side surfaces are only visible for tiles that are “above” neighbouring tiles. E.g. if you wish to create a deep water pool with a particular side-texture, that texture needs to be assigned as the side-texture of the surrounding edge tiles.
Tile Tweak Settings
Apart from texture, each tile can be changed in one of the following parameters.
Xtrude: The height of the tile’s top surface (e.g. positive for walls, negative for chasms), with side-walls extending down to the neighbouring tiles.
Height: Lifts the height of the tile, but without extending/extruding side walls. Applying different heights to tiles will create a smooth/organic look (e.g. for hills). Note that this effect is not properly shown in the editor, only in the actual game.

Logic: The logic setting of the tile can be set independently - ie you can create fake walls (a wall with Logic set to “Floor”) or invisible ice (a floor with Logic set to “Ice”).
Random: A random ripple on the tile’s top surface. The value given is the maximum height of the ripple (note: effect not visible in editor).
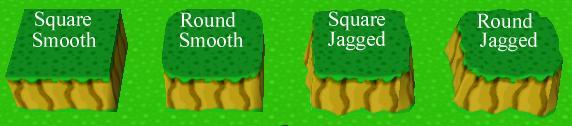
Corner: Corners of tiles can be set to Square or Round (note: effect not visible in editor).
Edge: The top edge of an extruded tile can be set to Smooth or Jagged (note: effect not visible in editor).
WHeight: The height of the water surface. To be visible, the water’s height needs to be above the tile’s Xtrude (+Height) value.
WTurb: The height of the waves in the water (added/subtracted from the water’s base height).
Advanced Technique: Placing your cursor on a Tile Tweak Setting (including textures) and pressing Return will “cross out” this setting. When placing a tile, any setting that is crossed out is simply ignored. For example, if you wish to change an entire group of tiles from Smooth to Jagged, but don’t want to change anything else, you can set the Tile Tweak to jagged, cross out all other settings, and paint over the required tiles.
Size and Other Settings
Width and Height of the Level can be altered by left/right-clicking the arrows around the stated dimension. Left-clicking adds a row/column of tiles to that side, right-clicking deletes a row/column.
Weather: Set from Rain to Snow To Blizzard (two options: Snow from left to right and vice versa) and Weird (funny colours).
Music: set the music or leave as “none”.
Leveltex: Cycle through available level textures. Right-clicking allows the specification of a custom texture (if you do this by mistake, just press return).
Watertex; Cycle through available water textures (only one available by default). Right-clicking allows the specification of a custom texture (if you do this by mistake, just press return).
FL/TR/GL: Three global water settings. Flow sets how fast the water is moving (0-still, >0 moving, <0 rocking back and forth). Transparency is set to yes or no. Glow is set to yes or no.
Light: Two different lights can be set (with RGB values each from 0 to 255). The first is the usual level light. This is a directional light (i.e. it brightens only certain sides of objects). The second is an ambient light level, which is distributed to all objects from all directions equally.
A note on custom textures. These need to be put into the Custom Content\Textures directory. Templates for LevelTextures and Watertextures are given, and should be followed for compatibility. Leveltextures must be a BMP file name ‘leveltex NAME.bmp’, and must have two other files ‘backgroundtex NAME1.bmp’ and ‘backgroundtex NAME2.bmp’ which are textures for the sides of the level. Watertextures must be JPG and named ‘watertext NAME.jpg’.
Buttons
LOAD/SAVE - This loads or saves a level file for an individual adventure. The filename must be specified as ADVENTURENAME/#, where ADVENTURENAME is the name of the Adventure’s directory (no subdirectories are possible), and # is the particular level number. Each adventure must have at least a “1” Level (since this is where it begins as a default). Multi-Level Adventures (see tutorial #3) can have several such files. Note: No error-checking is made at this point. If you misspell your ADVENTURENAME, a new directory with that name is automatically created (or, possibly, an old level-file from an old adventure is overwritten). Backup your own work often.
BLOCK - Gets you into Block Mode. Now entire rectangles of Tiles can be placed or altered at once. Once Block Mode is active, left-clicking in the viewable area selects the upper-left corner. Clicking again selects the lower-right corner. The resulting square has all tiles replaced with the current one. (Note: The Cross-Out option using the RETURN key is obeyed in Block Mode as well).
WIPE - Places/Alters ALL Tiles to match the Current Tile.
FLIP - Flips the level (including Objects) Horizontally, Vertically, or Diagonally. Note that Object’s control mechanisms are not automatically re-programmed to match the new level coordinates.
HIDE LOGIC/SHOW LOGIC - Setting this to Show Logic replaces all Wall tiles with solid red colour, all Ice Tiles with solid light blue, and Water tile with solid dark blue. This is a useful option to quickly check that manually set Logic settings match what you intended.
HIDE/SHOW LEVEL - Hiding the level still leaves objects visible. This is useful to check whether or not any objects where accidentally placed inside walls (or underneath the level surface).
BORDER CURRENT/DUPLICATE - When adding rows/columns using the re-size function, this option sets all newly created tiles either as the CURRENT tile, or DUPLICATES the former border tiles.
Objects
What follows is a description of objects and their modifiers. Modifier values are increased with the left mouse button and decreased with the right mouse button. Often the SHIFT key can be pressed to increase/decrease the modifier faster (e.g. to reach a high value quickly).
Barrels
Regular Barrels are impassable to Stinkers, but can be blown up by e.g. FireFlower fireballs. TNT Barrels will explode and destroy anything in neighbouring tiles. Cuboids can be set to one of the seven rainbow colours. They act like regular barrels but can be used specifically for the “Destroy All Cuboids” Adventure Goal.
Note: Barrels, as well many other objects (such as purely decorative objects) have a set of the following common modifiers (which will not be discussed each time):
Yaw/Pitch/Roll - three ways to rotate the object visually. Usually has no effect on the logic of the game (other than when noted).
X/Y/Z - three ways to shift the object visually. Again, this has no effect on the logic of the game (even if you can shift an object to appear visually in the next tile).
Scale - Determines the Size (again, only visually) of the object.
Bridges
Standard Bridges come in three varieties: ALTernating (go up and down in regular intervals), COLlapsing (go down after you step off) and REGular (do not move unless activated).
Note: Bridges also have some common modifiers with other objects. These will be discussed here and not subsequently:
Colour/SubColour (see Tutorial #3). Using Buttons with matching Colour/SubColour allows you to specify which bridge(s) a particular button operates. Some objects have restrictions on their colours (e.g. Bridges can only have one of four colours). There are always five possible SubColour values.
Active: Yes/No - An active Bridge is one that has surfaced. A non-active bridge begins its life submerged under water.
ActivationSpeed - How fast a bridge (de-)activates. A low value indicates the bridge will appear very slowly. A high value will have the bridge emerge or submerge almost instantaneously.
ActivationType - Different objects can appear in different ways. Common options are MOVE (object moves into position, such as the vertical movement of a bridge), FADE (object appears a semi-transparent and ‘magically’ appears in position) and GROW (object scales into position).
Sound: Water/Mecha - a choice of two different sound effects. Choosing “Water” also produces a visual water-ripple when (dis-)appearing.
Alternating Bridges also have a Timer and TimerMax setting. TimerMax indicates how many frames pass before the Bridge changes its position from up to down (or vice versa). Setting the current Timer to something other than its default (zero) allows you to off-set the movement of multiple Alternating Bridges.
Springs have a colour/subcolour value to match to Rotator-Buttons (but this is not shown visually). They can be positioned in one of eight rotations. (Visually, the should be place inside a column, but this is not necessary for game logic).
Transporter also have a colour/subcolour value (to be moved (=activated) by buttons) without a Stinker stepping on them. Transporters also have an ActivateID modifier. This setting allows you to set a transporter to only respond to being stepped on by an object with matching ID. Default is ALL. (Note that you can right-click to a special setting PLA - which indicates only the Player can ride this transporter).
Buttons
Buttons have several Colour/SubColour values, allowing a single button to control multiple gates/bridges/transporters/etc. They also share the ActivateID modifier with the Transporters (above).
Button types are Diamond (toggles the object), DiamondOnce (does so only once, after that is no longer active), Round (activates the object but deactivates once stepped off), Square (simply activates the object) and Star (activates the object but deactivates after a short timer has run out).
A second set of Buttons are the ColX2Y buttons. These are colour changer buttons, allowing you to change the colour/subcolour of matching (FROM) gates/transporters/teleporters to the set (TO) colour/subcolour.
InvCol and InvColX2Y buttons behave just like regular buttons, but are not visible in the game.
General Command Button (Advanced Option): allows an internal program command to be run. This button itself can be given an ID (allowing a second button to activate/deactivate it). It also has a Repeatable modifier - setting this to NO means this button will only activate once.
What follows is a list of common Commands and Data values (there are other undocumented commands, however nothing that is really useful for the editor):
| Command# |
Function |
| 1 |
Opens/Activates Objects with ID matching Data1 |
| 2 |
Closes/DeActivates Objects with ID matching Data1 |
| 3 |
Toggles Objects with ID matching Data1 |
| 5 |
Destroys Objects with ID matching Data1 |
| 6 |
Sets the Lighting of the Level to RGB Data1/Data2/Data3 |
| 9 |
Earthquake for Data1 frames |
| 21 |
Starts Dialog #Data1 with starting Interchange #Data2 (=-1 if current default is to be used) |
| 22 |
Changes Dialog #Data1 to have new default starting Interchange #Data2 (do not run this command while inside Dialog Data1) |
| 23 |
Activates "AskAbout" #Data2 inside Dialog #Data1 |
| 24 |
DeActivates "AskAbout" #Data2 inside Dialog #Data1 |
| 25 |
Toggles "AskAbout" #Data2 inside Dialog #Data1 |
| 26 |
Set AskAboutActive #Data2 of Dialog #Data1 to value #Data3 |
| 27 |
Set AskAbout #Data2 of Dialog #Data1 to point to Interchange #Data3
|
| 111 |
Refills Lamp
|
| 112 |
Sets Inventory to 4x4 Size
|
| 113 |
Sets Inventory to 5x5 Size
|
NPC Change Button: allows changing the behaviour of a Stinker NPC with matching ID to be changed (such as what Dialog they have, what Animations they have, etc). As a default, all settings are set to “No Change”.
NPC Exclamation: creates a particle (or multiple particles) above the head of the Stinker NPC with matching ID. The following picture shows the currently available particles (starting with #0 in the top-left corner). E.g. particle #10 puts a “?” above the NPC for a short time.

NPC Move: issue a “move to” command to the NPC (Stinker or Thwart or Wysp) with matching ID. DelayTimer is a timer that counts down to zero while the “button” is “pressed” and only issues the command after the timer reaches zero. A value of zero means the command is issued immediately. Higher values indicate that the button would have to be pressed for some time before the affected NPC starts moving. DelayTimer Reset is the value that the DelayTimer is reset to after it has run out the first time (and subsequent times).
Rotator: rotates Springs or Transporters with matching Colour/SubColour. Also available in Invisible.
Environment
Basically different types of particle generators. “Splish” (in its default setting) creates small water splashes on the surface of the water. “Spray” makes a small particle fountain (with gravity). “Steam” makes a fading particle spray (without gravity).
Gates
Use Colour/Subcolour values to match to buttons. Can start as either Active (closed) or DeActive (open).
Colour-Block Gates visually match their Colour values (a second modifier, Frame, allows the choice of different styles). A Zadjust/ZScale modifier changes the visual position and size of the gate, but does not alter its logic.
Dungeon Doors do not match their Colour values (but come in multiple styles, these are independent of the “logical” colour value assigned to them). Should be placed in an opening between to walls for best visual effect. Important: While Yawadjust can be set to any value for visual effect, the door will only function properly if set to 0, 90, 180, or 270 degrees. (Use the SHIFT key to change the YawAdjust modifier in 45-degree steps).
TollGates: These open once a certain number of stars/coins are reached. For the editor, only coin gates make sense (since you will never have any stars). The “cost” of the coins is subtracted from your inventory if the gate opens.
Houses
Contains a list of house/city related object. Most of these are for visuals only. One-Tile objects (such as lamp posts) are treated as obstacles to Stinkers. Multi-Tile objects (such as Canopies or Cottages or Townhouses) are completely “walk-through”, and it is up to you to manually set the logic of the tiles that you don’t want to have a Stinker enter.
Special notes:
Bridge-End: this is a visual only. If placed on water it does not automatically change the logic of the water from “Water” to “Floor” - this also needs to be done manually.
Cottage/CottageDoor: The CottageDoor has a colour/subcolour value to match with buttons and fits into the doorframe of the cottage. However, for correct opening animations, the Cottage/CottageDoor has to be placed at 45-degree angles, specifically 0, 45, 90, 270, or 315 degrees (the missing values are not needed since doors from that angle are hidden by the cottages themselves). Any other value is still possible for purely visual effect.
Townhouses: Two different Townhouse styles exist with matching Doors - use the same angles as for Cottage Doors.
Windmills: Come in three parts. Place the Windmill first, then the windmill rotor one tile “South” of the windmill’s center (in the 0-degree rotation), then the cottage (!) Door two tiles south. The rotor only functions properly at 0, 90, 180, or 270 degrees.
Indoor
A number of decorative objects. None of these have any logical function.
Items
Coins: Can be collected to buy items (this needs to be created using special dialog structures) or open tollgates. Can be set to DeActive, given an ID, and activated using (e.g.) a button (in which case they visually appear out of the ground).
Custom Items: Important: This includes the magic glove! Custom Items allow a number of different functions. Each Item can be given an ID (to activate/deactivate it), a texture, and a function. Functions include making the item a Magic Glove, Lamp, Glow-Gem, or Spy Eye (Note: regardless of what texture is chosen, i.e. you can make an item that looks like a Glow Gem but behaves like a Glove. Why you would want that, I wouldn’t know. :)). “Win Adventure” ends the adventure when picked up and “ID On/Off/Tog(gle)” controls another item with matching “Fn ID”. This function also has options for “local” (only works if the matching item is next to you) and global (affects all matching items in this level). Finally, a * indicates that this item is not picked up into the inventory, but activated/used immediately when picked up. Note also that Custom-Textures are available, by copying a icons-custom.bmp file into the adventure's directory.
Gems: Two basic shapes (for 100 and 250 points respectively) are available. The third shape (Crystal Shard) is just for show - the Crystal Shard music capability from the Wonderland Adventures game is not available in the editor.
Goldstar: Wins the adventure when picked up.
Keys: Unlocks gates with matching colour/subcolour.
Level Exits
LevelExit: this allows the construction of multi-level adventures. See Tutorial 3.
StinkerExit: used for wee Stinkers to exit the level in “Rescue all Stinker” levels.
Magic
GloveCharge: Currently available colours are Yellow “POP”, Blue “BRRR” and Purple “BLINK”.
Monsters
Chomper: Speed settings allow fast and slow chompers. Special setting “Ghost” creates Ghost Chompers that can go through objects (as seen in Wakka Wakka) and “Glow” Chompers glow in the dark (as seen in Chomper Cave).
FireFlower: “Turning” can be set to None (Flower always looks in the same direction), Player (Flower follows player), Clockwise and CoutnerClockwise (turns after each shot/spit). TimerMax1 denotes the number of frames between shot/spits.
Scitter: no settings.
SpikeyBall: Next to Speed and Direction settings, the Bounce Left/Right setting determines how a SpikeyBall should deflect of a wall/obstacle.
Turtle: Direction and Turn (=Bounce) settings same as for SpikeyBall.
NPCs
Stinker NPC: See the “Button - NPC Command/Change” section for details on each Stinker setting.
Thwart: “Shooter” turns this Thwart into a Fireball-Flinger (when stationary) with TimerMax giving the frames between shots. Otherwise, similar to Stinker NPCs in their behaviour (and controlled with the NPC Move command as well).
Wee Stinker: no settings.
Wysp: As Stinkers and Thwarts, Wysp can be moved with the NPC Move command. Wysp can also be given dialog.
Other
These are various other decorative objects. None have a specific function.
Outdoor
More decorative objects.
Signs
Different visual styles of signs are availalbe. They are given a dialog (note that 10,000 is added for signs for internal reasons. I.e. a sign with dialog #10001 refers to the #1 dialog file) and can be given several movement options (swaying/turning/bouncing).
Teleports
Two Teleporters with matching colour/subcolour will connect. Subcolour 3/4 also have their own visual effect.
Traps
Cage: Cages can be opened/closed using buttons. As a default they are given colour #9, subcolour #0. Changing the colour does not have a visual effect.
Fire: Firetraps can also be activated/deactivated using buttons (default colour #12, also no visual effect for colour changes). TimerMax1 indicates the length of the burn period, TimerMax2 the length of the rest period. Timer is the current timer position (counts down to zero. Used e.g. to have several firetraps with offset timing).
| |

