|
Wonderland Adventures Editor
TUTORIAL 1
Our Very First Adventure
To get the hang of the Wonderland Adventures Editor we strongly encourage you to follow the steps presented in these tutorial very carefully, one by one. In this first tutorial we will make a very basic level, just to cover all the steps involved in the creation of an adventure.
First things first, get a pad of paper and a pen. You’ll need them soon, so keep them handy.
You’ll notice that there are several executables (and Start Menu links) available:
* Player -This program allows you to play/test your adventures (and those of other users, of course). We will not deal with this program in this tutorial, as we covered the basics of playing an adventure previously. (There is a second executable, wp.exe, which is connected to the Player).
* Editor 3D - This is the basic level creation tool. You will always need to create at least one level with this editor for any adventure.
* Editor Master - This program defines some overall characteristics of the adventure. You will need to create a Master file for every adventure you create.
* Editor Dialog - This program allows you to create dialog structures. You will need to run this if your Adventure contains NPCs (with conversations) or Signs. We will deal with Dialog in Tutorial 4 and can safely ignore this program for our first adventure.
Alright, start up the Editor 3D program. You should see a window similar to this one:
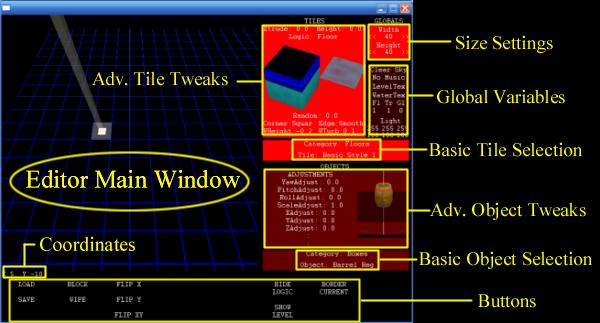
For now, we will only concentrate on three things: the Basic Tile Selector, the Basic Object Selector, and the LOAD/SAVE Buttons. Do not click into the Advanced Tile/Object Tweak areas yet.
Let’s start with tiles. The Basic Tile Selector has two rows. The top row lists basic tile categories. Left click on the top row to cycle through the list (right-click will cycle in the other direction). Available categories are Floor, Ice, Walls, and Water. Each category has a number of possible options, shown in the second row (again, use left-click or right-click to cycle through).
Right now, the Tile setting is set to Basic Floor, Style 1. Select the “Wall” Category and then any of the available walls (they come in different styles and heights). For my example, I picked the first one, Style 1 Height 0.5. The currently selected Tile is shown inside the Advanced Tile Tweaks window - but remember not to click on it yet.
Now let’s place some walls. Move your mouse into the viewing window and left-click to place the currently selected tile. You can use the NUMPAD keys (or the letters QWE,ASD,ZXC if you are working on a laptop) to scroll and zoom the viewing window.
Next, go back to the tile selector and select a basic Water (Depth 1) tile. Draw a little bit of water as well. I’ve drawn a tiny maze with a small pool of water. Don’t worry about the exact position, this is just a practice run. If you place a wall or water where you did not want any, simply select a basic Floor tile and cover it up again.
You might get something like this:
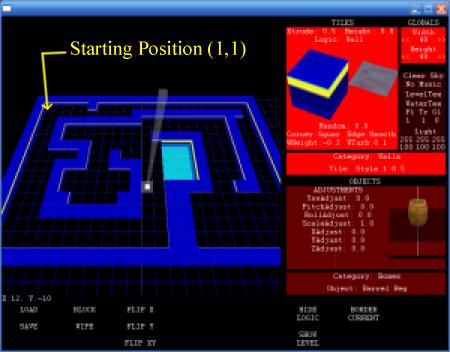
I’ve also decided that I want to start my Stinker in the upper/left corner, at position x=1, y=1. (The current coordinates of your cursor are shown just below the main editor viewing window). Remember that pad of paper? Write down “Starting Position 1,1” on it (or whatever the coordinates of your starting position are - just make sure you always start on a floor, and not in a wall or on water).
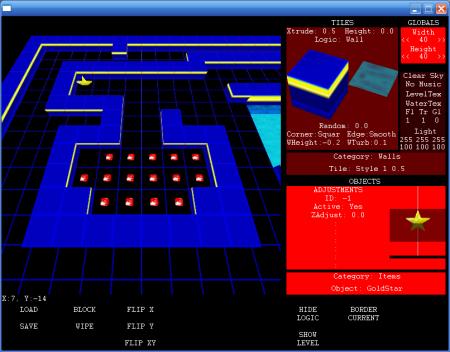
Now we will place some basic objects. Click on the image of the wood barrel. You’ll notice that the entire Object area will light up bright red, and the Tile area will dim. You are now in “Object Mode”. (Clicking back on e.g. the tile selector will bring you back into “Tile Mode”).
Again, there are two rows. One for categories, one for selections within a category. Left/Right-clicking cycles through available options.
We will place a few bonus gems, as well as the Star to finish the adventure.
Set the category to “Items”, then select “Gems”. Again, don’t tweak any object settings yet. Left-click in the Editor Area to place a few bonus gems. Then select “Gold Star” (also in the “Items” category) and place the Gold Star.
You are now ready to save this level. Click on the “SAVE” button. A prompt will appear. Type in the name of this Adventure (e.g. “TEST” or “MYADVENTURE1“) followed by “/” followed by “1”. The “1” indicates that this is the first level for this adventure. Our adventure only has one level, but you can create multi-level adventures (see Tutorial 3).
Let’s call our Level “TUTORIAL1/1“ (i.e. the first level of the TUTORIAL1 adventure).
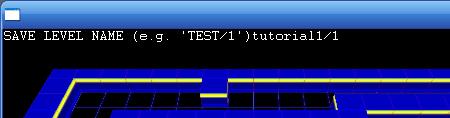
This will create a “TUTORIAL1" sub-directory in your Adventures directory and save a “1.wlv” file in it. Please note that no error checking is made in this step. Any old “1.wlv” will be overwritten. If you make a change and save, but mistype the name (e.g. TUTURIAL1/1) then a different directory/level will be created. It is advised to be careful with your naming convention and to backup your existing levels from time to time to avoid accidentally overwriting them.
Alright, our first adventure is almost ready. Let’s exit the level editor.
We always have to create a master file for an adventure. Startup the “Editor Master” program. This allows you to create a Title for the Adventure (which can be more descriptive than the filename used above), up to five lines of level introduction, the starting position of your stinker (set this to STARTX: 1 and STARTY: 1 - remember your note on that pad of paper?), and the winning condition for the adventure (leave this at the default “collect gold star”).
Press the “SAVE” button and enter “TUTORIAL1” as the filename (i.e. the matching directory name used for the 3D level above - note that we do not need to specify a specific level number, since there’s only one master file per adventure.
You’re all done! Exit the Master Editor, run the Player, and give your first adventure a whirl.
| |

