|
Wonderland Adventures Editor
TUTORIAL 3
Multi-Levels and Colour IDs
For our third tutorial adventure, we will create a multi-level adventure and learn about two essential aspects of the editor: IDs and Colour.
First, start the 3D Editor again. Press the LOAD button and load “TUTORIAL2/1”, then SAVE it as “TUTORIAL3/1”, i.e. we will use our Tutorial 2 level as one of the levels for our Tutorial 3 Adventure.
First, we will “open” the barricaded door. Right click on the door tile to “pick it up”. Then change the side texture to an open door texture (see Tutorial 2 on how to do this).
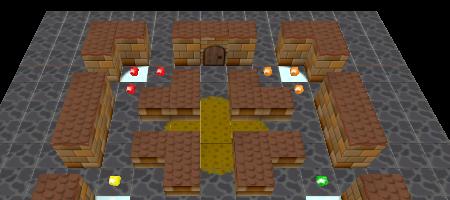
Now suppose we wish to change the colour of one of the gems. Right-clicking on the Gem doesn’t pick up the Gem, but the tile underneath. That is because we are in “Tile Mode” and not in “Object Mode”. Click the image of the barrel to switch to Object Mode, then right-click one of the gems. Change its colour and place it back into the level.
Note: just changing the setting in the Object Tweaker doesn’t change the actual object in the level. You actually have to place the object as well.
Let’s also delete the chomper. Simply move your cursor over the chomper and press the “Delete” key.
Note: the “Delete” key only works for objects and automatically switched you to “Object Mode” if you aren’t already in it.
Now we want to create a path through the door into a second level of our adventure. In the Object Selector, Select “Level Exits/Level Exit” (the red arrow). Don’t tweak anything yet, just place it south of the door at position (7,4).
Your level will look like this:
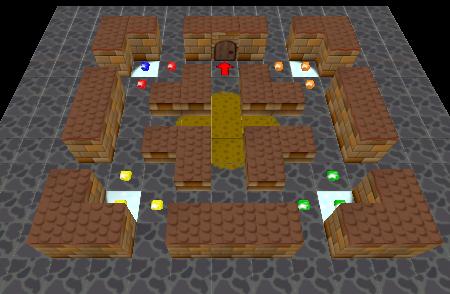
Grab your pad of paper. Suppose our Stinker walks through this door, then turns around and returns from Level 2 to this level. Where will the Stinker appear? At position (7,5) - one tile south of the arrow. We’ll need this for later, so write down “Level 1 - (7,5)”.
Ok. Save this level as “TUTORIAL3/1”.
Now we will make the second level of the adventure. Unless the level is quite similar, you might find it easiest to simply exit the editor, then reload and start fresh.
So:
* Exit the level editor and reload it.
* Re-Size this level to 11x11
* Left-Click “LevelTex” to select the cellar/dungeon texture.
* Select any desired music or weather conditions for this level.
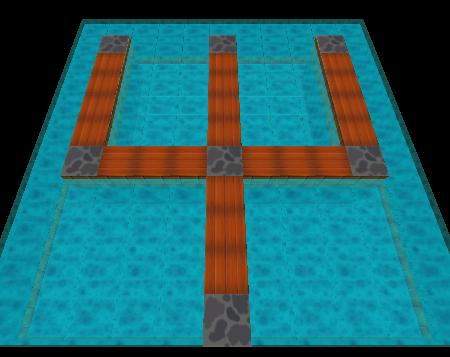
I want it to contain primarily water, so I will select Water/Depth 2 from my tile selector. I could “paint” all the tiles to be water, but I will simply press the “WIPE” button. This changes every tile into the currently selected tile. We now have an 11x11 pool of water.

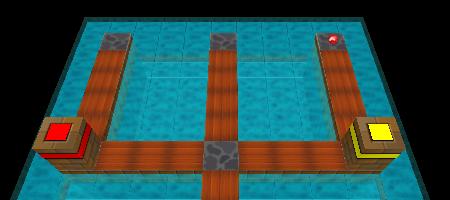
Now lets create the walkable parts. From the Tile Selector, select a basic Floor Tile. Changing the top texture to Wood Planks and rotating as required, draw the following level:
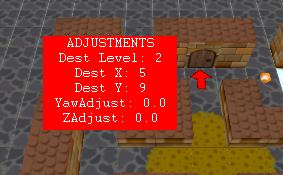
Now we will place a way back to the first level. Go into “Object Mode”, select the Level Exit Arrow again. Let’s do some tweaking: turn it 180 degrees around using ObjectYaw. We want the Stinker to appear in Level 1 at position (7,5) (from our paper notes)... enter those and place the arrow at the south end of the level (as shown).
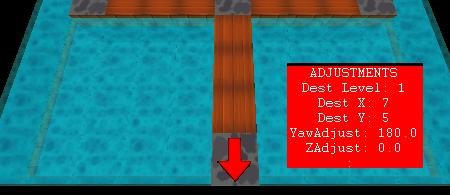
Note that we now know that our Stinker should appear in Level 2 at position (5,9), just north of the arrow. Note this on your notepad, then SAVE the level as “TUTORIAL3/2” (i.e. the second level of the TUTORIAL3 Adenture).
Let’s LOAD the first level, “TUTORIAL3/1”, back. Select its LevelExit arrow (right click on it while in Object Mode) and set its destination to Level 2, (X,Y)=(5,9). Then place the arrow (don’t forget to always do that), save the level again as “TUTORIAL3/1”. You now have a two-way link between two levels in this adventure.
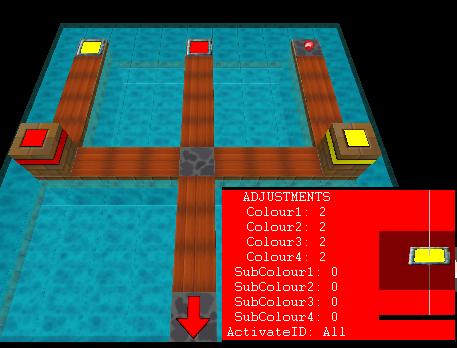
Let’s try something different. Re-load “TUTORIAL3/2”. Go into the Object Selector and Select the “Gate/Colour Block” object. A standard red gate should be visible. Place it as shown, then tweak the “colour” setting to yellow, place it as shown as well. Finally, place a final gem in the upper right corner.
Now we need ways to open these gates. There are two ways in which Wonderland links objects. One is using an ID value. For example, an NPC might be given an ID of 12, then a command could be issued to that NPC by referring to its ID value of 12.
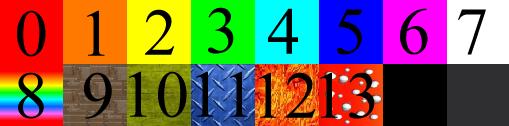
The second option is using colours. There are a number of possible colour options available, numbered 0-13. These include the standard Rainbow colours, as well as some special colour patterns. Note that colours 14/15 should not be used - they have some internal uses and might lead to unexpected results.
Some object (such as Gates) can take any colour. Others (such as gems) are restricted to fewer colours. If I want to create a button to open a matching gate, I now create a button with matching colour. There is also a “subcolour” value for some objects, which can take on any value between zero and four. This allows to differentiate e.g. up to five different red gates (e.g. if I want a red button to only open one of two red gates, I give the second red gate a different sub-colour value).
Advanced Note: ID #s and Colours are matched by the following formula:
ID = 500 + Colour *5 + Subcolour
E.g. a Yellow Gate (colour 2) with subcolour 3 could also be accessed by referring to objects with ID 500+2*5+3 = 513.
Let’s start with a simple red square button to open that red gate. From the object selector, select “Buttons / Colour Square”. The default is already a red button, so let’s place it in the top center of the level. Now let’s make a yellow button for the second gate. Change the Colour1 Tweak to a value of 2 (=yellow). Note that only a quarter of the button has changed colour. Each square button can actually control up to four different gates. We want the entire button to be yellow, so change all four colours to a value of 2. Don’t touch the sub-colour values, since our gate had the standard sub-colour of zero.
Place the yellow button in the top left. Your level should look as follows (the picture also shows the settings for the yellow button):
Alright, we’re almost done. Save the level as “TUTORIAL3/2” and exit the editor.
All we need to do is create the master file. Load the TUTORIAL2 master file. Since the starting position and goal (“collect all gems”) remains the same, all we need to do is change the Adventure Title, and save the new master file as TUTORIAL3.
All done - you should now be able to play this 2-level adventure with gates and buttons.
| |

