|
Wonderland Adventures Editor
TUTORIAL 5
Dialog Structures
This tutorial comes in two parts. First, an overview of how to make the most basic dialog - e.g. a sign. Then we list the command structures for more advanced options.
Each dialog consists of a series of interchanges. An interchange has a main body of text, followed by several possible responses. Each response can have two different commands associated with it.
A separate structure, the "AskAbout", is used for lists of questions that can be asked, and is treated separately.
Let's look at a basic example of dialog. Create an adventure (or use one of the previous tutorial adventures) and place a single sign in it. Signs and NPCs have dialog numbers associated with them. NPCs have possible dialog numbers 1, 2, 3, ... Signs have possible dialog numbers 10001, 10002, 10003, ... These two actually point to the same dialog number, signs have a +10000 added for internal reasons only. So, create a sign with the default dialog number 10001 (i.e. pointing to dialog structure #1). Save the adventure.
Now start the Dialog Editor. We want to create the dialog structure #1 associated with the current adventure. Hence its name (for saving or loading) is ADVENTURENAME/1, i.e. we use the same structure as we do for different levels in an adventure.
Type in some text into the main body under Interchange #0, e.g. "This is a sign." Then type in a reply under Answer #0, e.g. "OK". Just under the Answer is a list of command options. The first two, FN and Data, are dialog specific commands. Change FN to 1. This command exits the dialog, i.e. once "OK" is clicked, the dialog box will close again.
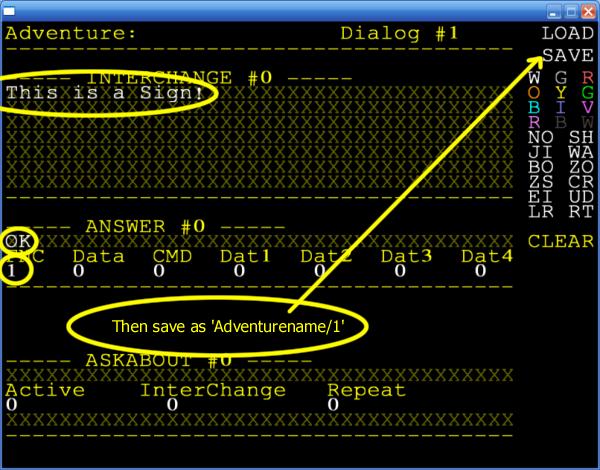
Now save this dialog as "ADVENTURENAME/1" (depending on your ADVENTURENAME). This should put a "1.dia" file into your adventure's subdirectory.
You can now exit the dialog editor, and start the adventure. Your sign should be readable.
ADVANCED OPTIONS
1.
Multiple Interchanges/Answers. Interchanges/Answers can be added by left/right clicking on the Interchange Line. Note that each Interchange has its independent set (and number) of answers. Each Interchange MUST have at least one Answer.
2.
Text can be "prettied up" using the symbols on the right column. e.g. the first three rows are colours, from (W)hite to (V)iolet. To change colour, click the colour (e.g. (Y)ellow), then the first letter that you wish to change to yellow.
Note: (1) This changes all remaining letters to yellow, until a new colour command is encountered. To change just one word to yellow, you'll have to also put a (W)hite command at the start of the next word. (2) It is best to first decide on the final text of the Interchange, and only then set colours/etc, since changes in the text will "shift" the location of your colour commands. (3) Only the main text can have colour commands. (4) In total, an interchange should not have more than 20 such commands! (5) We'll leave it up to you to explore and experiment with the remaining commands on that list.
3.
Answer Functions set with FN/DATA are dialog specific commands, as follows:
| FN |
Result |
| 1 |
Ends the Conversation and sets the Default Starting Interchange to #Data (i.e. next time this dialog is started, you'll start with that Interchange). |
| 2 |
Branches to Dialog Interchange #Data (i.e. clicking on this answer will result in that dialog interchange to show up immediately). |
| 3 |
Starts the AskAbout structure (see below). "Data" not used. |
| 4 |
Performs a 'Coin Check' for #Data coins. If the player does not have this many coins, the next interchange # is started. If the player does have this many coins, then they are subtracted from the inventory, and the Interchange two #s further is started. |
| 5 |
Performs an 'Item Check' for an Item with ID #Data. If the player doesn't have it, InterChange+1 is started. If the player does have it, it is deleted from the inventory, and InterChange+2 is started. |
Note: You MUST select an FN of one of 1-5 for each answer.
4.
Each Answer can also be given an Adventure Command, for example, clicking a particular answer might open a door or make an item appear. These CMD/Data1/Data2/Data3/Data4 values match those discussed in the "Buttons-General Command Button" list of the Editor Reference page.
5.
AskAbouts: You can set several possible AskAbouts (left/right click to select) and one common header line (e.g. Header="What do you want to know about?" and AskAbouts could be "Door", "Castle", "Gem", "Nothing, thanks".) Each AskAbout answer is given three values. "Active" must be set to either -1 (if it is active) or -2 (if it isn't active, i.e. does not yet appear in the list of options). "Interchange" is the Dialog Interchange number that is started once this Askabout answer has been clicked. "Repeat" is set to -1 (if this AskAbout should always appear) or to +1, +2, +3, ... (denoting how often one can choose this AskAbout before it disappears from the list).
Why use AskAbouts rather than Dialog Structures (which can do any of the above)? The advantage of AskAbouts is that individual answers can be activated/deactivated using the General Commands, hence this allows for modifiable conversations. For example, one character might have a deactivated askabout "Crystal", hence you cannot ask about the Crystal (this choice does not appear on the list). A second character tells you to ask Character #1 about a Crystal. That interchange would be linked to a command to activate the Crystal-Askabout of Character #1. Returning to talk to Character #1, the AskAbout "Crystal" now appears as an option.
Dialogs require a lot of planning and experimenting to get the hang of things. They are certainly for advanced users only, but allow level designers to add a whole new level (no pun intended) of complexity to their adventures!
| |

