|
Return to Wonderland
Level Editor
Advanced Option: Custom Models
Return To Wonderland Deluxe also gives you the option to create entire 3d models and insert them into the game. While these objects are non-interactive, it will allow you to create a wide variety of level designs - from giant castles to interior of rooms (complete with chairs, sofa, and bookcase). This option is for very advanced users only, as it does require you to have some experience with 3D modeling software.
Here's a quick step-by-step tutorial on how to insert a custom model.
First, you need to create a model in .3DS format, with a single "skin" file in .JPG format. This tutorial will assume that you have some basic 3D model skills and know how to create such files. If not, you can check on the web for lots of free online tutorials. Please understand that we cannot provide you with support on various model creation packages or how to create your own models.
Tools you will need include a 3D Model creation package (there are many online, from small freeware application to professional design programs worth many hundreds of dollars). A mid-range model program is Milkshape, available with a 30-day demo at http://www.swissquake.ch/chumbalum-soft/. This is the software that was used to create all of the Wonderland models. You will also need a paint package (again, a range is available from Microsoft Paint (free) to Photoshop ($$$)).
So, let's grab a free model from the internet. There are many such sites online (again, do a Google search). This tutorial will use a model from Psionics 3D Resource site (http://www.psionic3d.co.uk) which also has some very nice tutorials on model and skin creation. From the site, we'll download the f360 Ferrari car model. Let's give Stinky a brand new ride! Unzip the .ZIP file. It contains several .JPG files (for different colour cars), a .3DS model and a .MS3D file. The 3DS file is what we want (the MS3D file is specifically for use with Milkshape 3D). Which one you'll work with just depends on what files your 3D model creation package can load - most should be able to load .3DS files without problem.
Create a new sub-directory "CustomModels" in your Return To Wonderland directory. Create a further sub-directory called "f360ZUTJRE". Funny name, you say? This directory name is completely up to you, but it should be fairly unique/random, so that there's little chance of another user using the same directory name for their creations. Hence the appended random letter sequence "ZUTRJRE" after the f360. Copy the .3ds and the red .jpg file into that directory, and rename them model1.3ds and model1.jpg respectively.
Now load the editor, and press SHIFT-M (QWERTY KEYBOARD) to activate the Custom Models. A textbox will appear prompting you to enter the name for the custom model directory to use for this level. Enter the same directory name, "f360ZUTJRE". Note that this name now appears at the bottom of your editor screen. Now create a level, just using Stinky and what will hopefully be Stinky's brand new car. You can have up to four custom models in each directory, corresponding to the "A","B","C", and "D" objects. Since we named our model "model1", we have to use the "A" object.
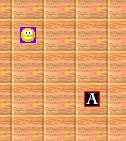
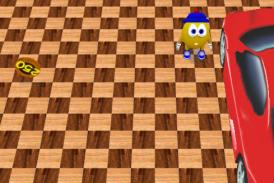
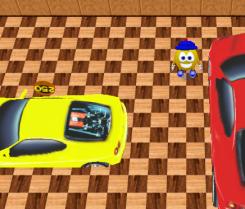
Let's try it out. Save the level, load the game and play the level - and voila, there's Stinky, looking understandably happy!
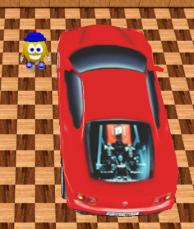
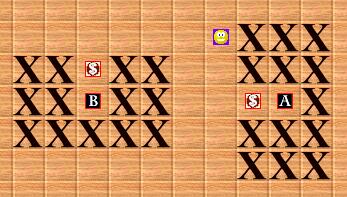
Let's deal with some finer points. First, notice that Stinky can walk "into" the car. This is because the Wonderland game has no way of knowing what shape or size your custom model will be. Hence all tiles, except the one where the actual "A" object sits, remain "walkable". Let's change that. Load the editor, and use the "X" floor tile to restrict the tiles of the level that the car sits on. The fit is not perfect, but the car sits roughly on 3x5 tiles. Let's restrict those, except for the tile where the car door is, and let's hide a bonus coin right there.
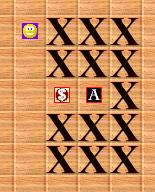
Save and play the level again. Now Stinky cannot walk through the car... and there's the bonus coin hidden in the driver's seat. A car and free money - must be someone's birthday!!!
Next, let's look at sizing and rotation. The car model worked great from the start, except for the slight overlap into adjacent tiles and perhaps the fact that we really wanted it to be oriented left-right rather than back-front. So let's create a second model with these properties fixed. Our goal is to create a second car model, yellow, and oriented left-right. This will be called "model2.3ds" and "model2.jpg". The .jpg file is no problem, just copy the yellow skin file into this directory and rename it "model2.jpg".
The next bit gets a little complicated. It is important to realize what size and orientation your model files have so that they appear correctly in the game. Often a model just loaded from the internet will be completely invisible in Wonderland, either because it is too small, too large, off-center from camera, or oriented up-side-down (so that it actually is underneath the level). Added to this is the fact that some of the model packages have some peculiarities that can be unexpected - for example, Milkshape 3D orients and sizes models differently depending on if you save them as "MS3D" or export them as "3DS" files. The result is that you often have to simply proceed by trial-and-error until you have the model sitting correctly in your level.
Let's run through such a trial-and-error experiment with our car model. Obviously, your own experience will differ depending on your model, your creation package, etc, but this will give you some idea on how to proceed with these type of problem situations.
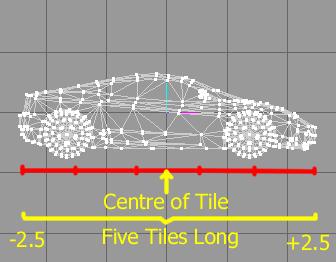
Load your 3D model creation package (this tutorial assumes Milkshape). Note that the origin (0,0,0) of your coordinate system corresponds to the centre of the floor-tile. The five tiles that this car is long can be seen in red below.
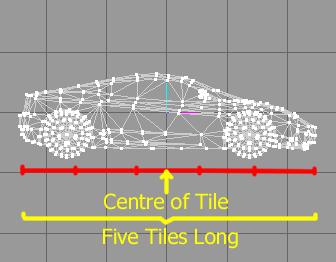
Already we notice something odd - if you check out the models coordinate range (displayed in the lower left corner of the Milkshape screen) you'll see that the .MS3D model actually ranges over 100 units left to right, not five (one unit in 3D coordinates corresponds to one tile in Wonderland). Let's just pretend we didn't see that. We just want to rotate the car, so let's "Select" the entire model, and "Rotate" it by -90 degrees around the Y-Axis. Now "Export" it as a "3DS" file and name it "model2.3ds".
Back in the editor, expand the level to include the second car, object "B". It's now oriented left-right, so we use the "X" tiles accordingly.
Save the level and run the game... start up your custom level and.... hey... where's my car??!?!?!?
If you use the ALT-X controls (hold down ALT-X then use the Numpad-Cursors) and zoom out, you can see that the car is still there, but it's huge, and turned on its side!!!
So we gotta fix that! Back in Milkshape, "Select" the entire model again, and "Scale" it in each direction by .05 (i.e. 5%) about the "Origin" (not "Center of Mass"!). You will have to zoom in in your three viewing windows, but checking the coordinates the car's length now goes from about -2.5 to +2.5, which is how it should be.
The car is actually still a bit longer than that (which is why Stinky overlapped with the model a bit at the front and back), so we Scale in the x-direction by another .95 (95%) - keeping y- and z-direction at 100%.
Let's just check what we have done so far. "Export" the model again as "model2.3ds", and re-load your custom level. There's the car, sized correctly, but still badly oriented.
We want to turn it "left" by 90 degrees. So, back in Milkshape, "Rotate" the entire model by 90 degrees around the X-axis. Export as "model2.3ds" again and re-load you level.
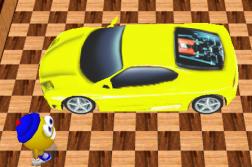
Orientation is fine. Position isn't fine yet (it sits half below the level and a little too far "south").
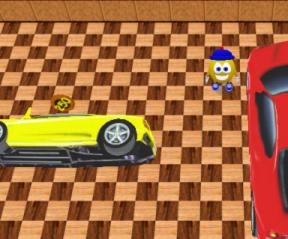
Back in Milkshape once more, use the "Move" function to adjust the position, export again. Finally, Stinky has a little yellow car to zoom around in (with bonus coin in passenger side).
You can now do some fine-tuning, if you wish. For example, you could adjust the size of the red car to match that of the smaller yellow car, or vice versa. You can paint the .JPG skin file to do a Rainbow coloured Wonderland Ferrari. Or, if you feel brave, you can create your own models from scratch, and share them with the rest of the community.
Speaking of sharing - once the adjustments are finalized, the hard part is done. Now this object can be used in any level, as long as (a) you specify in the editor the level directory name and (b) the directory exists an has the approriate model and skin files. If you specify an incorrect directory name, or use models that don't exist (in our case, for example, "C" and "D"), Wonderland will simply use the default "Pillar" object.
You may upload models individually, or upload up to four models that you feel work well in a "set". When you upload a deluxe level that uses a particular set of models, make sure you also write in your level description post the name of the custom directory that is required, as well as the (up to four) models that need to be in that directory. See the example posts in the forum.
Model creation can be a lot of work - but it is also extremely satisfying to see an entirely original creation unfold on-screen. Good luck and, as always, have fun!
Click here to return to the Index.
| |

